
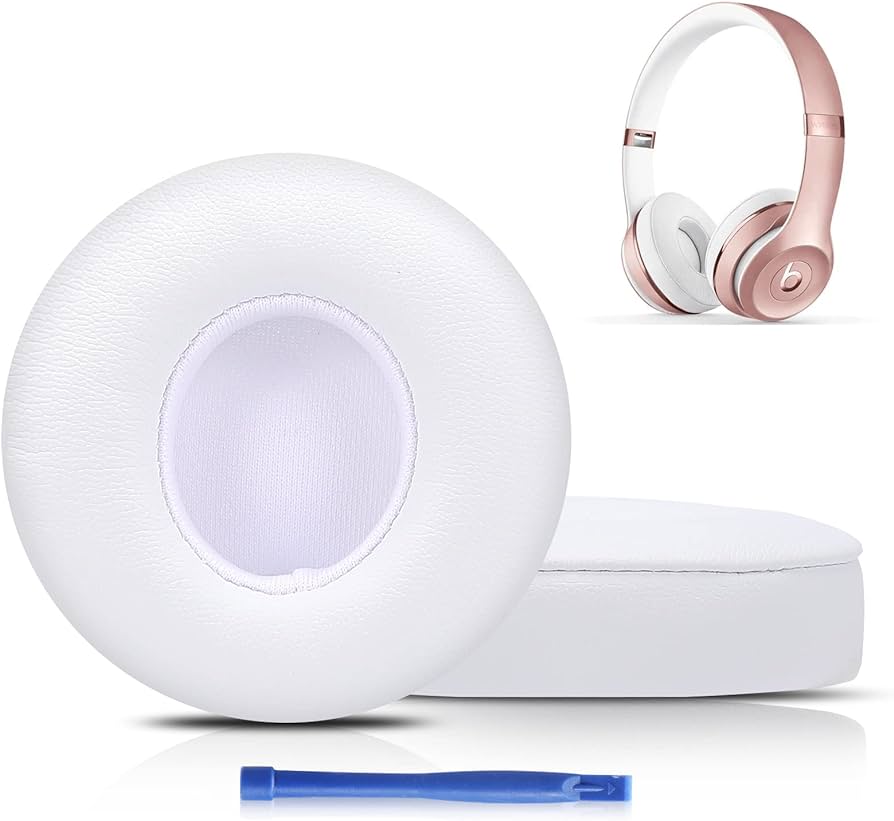
To replace ear pads on Beats Solo3, peel off the old pads and snap the new ones into place. Use a firm but gentle touch to avoid damage.
Investing in high-quality ear pads can breathe new life into your Beats Solo3 headphones, ensuring comfort and optimal sound performance. Regular use can wear out the cushions, affecting both the fit and the acoustics. Replacing them is a simple and cost-effective way to maintain your listening experience.
This swift maintenance trick not only rejuvenates the headphone’s aesthetics but also enhances the overall audio isolation, keeping your music experience immersive and pure. With fresh ear pads, your Beats Solo3 will feel brand new, ready to deliver the premium sound quality that Beats is known for.
Credit: www.beatsbydre.com
Why Ear Pad Replacement Is Necessary
Ear pad replacement for Beats Solo3 headphones is essential. Over time, ear pads suffer from regular use. It leads to decreased comfort and sound quality. Fresh ear pads can revive your listening experience. Let’s explore why and when to change them.
Signs Of Wear And Tear
- Physical breakdown: Visible tears or cracks appear on the cushion.
- Flaking material: The faux leather starts to flake off.
- Lost cushion: The pads become less puffy, diminishing comfort.
Impact On Sound Quality And Comfort
Sound leakage: Worn-out pads can’t seal correctly, leading to sound escape. This affects the audio performance of your Beats Solo3 headphones. You lose those deep bass and crisp highs that Beats are known for. Moreover, outside noise might seep in, disrupting your audio experience.
Reduced comfort: With padding gone, the hard inner material may press against your ears. Long listening sessions turn from pleasure to discomfort. Healthy ear pads cradle the ears with cushioning. They also prevent excess heat buildup during prolonged use.
| Issue | Impact |
|---|---|
| Deteriorated Ear Pads | Compromised Sound and Comfort |

Credit: www.ebay.com
Identifying The Right Replacement Pads
Time to make your Beats Solo3 like new again? Choosing the correct ear pads is crucial for comfort and sound quality.
Authentic Vs. Third-party Pads
Authentic pads guarantee the same quality and fit as your original Beats Solo3 ear pads. Third-party pads, on the other hand, can be less expensive but vary in quality.
- Pros of Authentic Pads:
- Perfect fit for Beats Solo3
- High-quality materials
- Maintains sound isolation
- Cons of Third-Party Pads:
- Possible size mismatches
- Variable material quality
- May affect acoustics
Selecting The Best Fit And Material
Select pads that match the dimensions of your Beats Solo3. Check the material for durability and comfort.
| Material | Comfort | Durability | Sound Quality |
|---|---|---|---|
| Leather | High | Very Durable | Excellent |
| Foam | Soft | Less Durable | Good |
| Velour | Extra Soft | Medium | Varies |
Remember: The fit affects comfort. Material affects sound and longevity. Choose wisely for the best experience.
Tools You’ll Need For The Job
Ready to breathe new life into your Beats Solo3 headphones? Replacing ear pads is a simple upgrade. It gives your headphones a fresh look and restores comfort. First, let’s gather the tools needed for this easy DIY task.
Basic Toolkit
- Replacement ear pads: Ensure they’re compatible with Beats Solo3.
- Precision screwdriver: Sometimes needed for small screws.
- Plastic opening tool: To pry ear pads without damage.
- Cleaning cloth: Remove dust from the exposed areas.
Preparing Your Workspace
- Choose a clean area: Free from dust and clutter.
- Lay a soft cloth down: Protect your Solo3’s from scratches.
- Organize tools within reach: Keep the process smooth and efficient.
- Have patience: Take your time for the best results.
With these tools and a prepared workspace, you’re set for success!
Step-by-step Replacement Process
Welcome to the ultimate guide on replacing the ear pads on your Beats Solo3 headphones. A new pair of ear pads can make your headphones feel brand new again. This simple process is something you can do at home with just a few minutes of your time. Follow these steps to ensure a successful swap-out.
Removing Old Ear Pads
To start, let’s remove the old ear pads:
- Switch off your Beats Solo3 headphones.
- Gently pry under the ear pad with your fingers.
- Slowly peel the ear pad away from the plastic backing.
- Repeat for the other side.
Take care to not force the pads or use sharp objects that might damage the plastic. Most pads are secured with adhesive and will release with gentle, consistent pressure.
Attaching New Ear Pads Securely
Next, attaching your fresh ear pads correctly is crucial:
- Check the new ear pads for any protective film and remove it.
- Align the ear pad with the outer edge of the headphone cup.
- Press firmly around the edges to secure the adhesive.
- Ensure the pad is flush and there are no gaps.
- Repeat for the second ear pad.
Accuracy is key to avoid any unwanted noise leakage or discomfort.
With fresh ear pads, your Beats Solo3 will sound and feel like they’re fresh out of the box. Enjoy your rejuvenated listening experience!
Testing And Troubleshooting
Finished swapping the ear pads on your Beats Solo3? Let’s make sure they’re in perfect shape. This step is crucial. It ensures your music journey remains smooth and comfortable.
Ensuring Proper Fit And Comfort
Fit and comfort are key after fitting new ear pads. Take these steps:
- Check alignment: Ear pads should sit evenly around the ear cups.
- Press gently: Ensure they clip in place without gaps.
- Wear them: Adjust the headband. They should feel snug, not tight.
- Listen: Test with your favorite track. Look for clear sound quality.
Solving Common Issues Post-replacement
Sometimes, new issues may arise post-replacement. Here’s how to tackle them:
| Issue | Solution |
|---|---|
| Loose Fit | Realign and press down firmly around edges. |
| Uncomfortable Pressure | Adjust the headband or stretch it slightly if too tight. |
| Sound Leakage | Ensure ear pads are sealed properly with no gaps. |
| Distorted Sound | Check for proper installation without blocking any speaker ports. |
Pro tip: If issues persist, remove and re-attach the ear pads or consult an expert.
Maintaining Your Beats Solo3’s Ear Pads
Keeping your Beats Solo3 headphones in top shape is key to enjoying your music to the fullest. The ear pads on these headphones can wear out with time but maintaining them properly can prolong their life. Here’s how to keep them looking and feeling new!
Cleaning Tips
Regular cleaning is essential for your ear pads. Dirt and oils from your skin can affect the pads. You do not need special tools for this task. Here are some simple steps:
- Use a soft cloth: It’s best for the delicate material.
- Dampen with water only: Avoid harsh chemicals.
- Gently wipe down the ear pads to remove dirt.
- Let them air dry: Do not use a hairdryer or direct heat.
Preventing Future Wear
- Avoid exposure to extreme temperatures.
- Keep sharp objects away: They can puncture the pads.
- Use a case: It protects the headphones when not in use.
By following these simple steps, your Beats Solo3’s ear pads can last longer. A little care goes a long way. Clean pads make your headphones feel fresh and comfortable every time you use them.

Credit: www.amazon.com
Conclusion
Replacing the ear pads on your Beats Solo3 can breathe new life into your favorite headphones. With clear steps and the right tools, this simple DIY task ensures continued comfort and sound quality. Remember to purchase genuine pads for the best fit and performance.
Enjoy your refreshed Beats and happy listening!

Hello, I am Howard E. Glover, the CEO, and founder of soundsvia.com We Are Talk About Audio Sounds Systems like Headphones, Earbuds, Headset, and Earphones


