You cannot directly upload songs to Solo3 Beats headphones. They are designed to connect to a device that plays music.
Solo3 Beats, a popular wireless headphone model from Beats by Dre, are beloved for their rich sound quality and sleek design. Geared towards music enthusiasts, these headphones don’t store music files but rather function as a receiver of audio streamed from your smartphone, computer, or other Bluetooth-enabled devices.
Users often praise them for their comfortable fit and impressive battery life, making them ideal for those on the go. Whether you’re a fitness buff, a daily commuter, or just someone who appreciates the intimacy of a personal audio experience, Solo3 Beats elevate your listening sessions with their ease of use.
Credit: www.amazon.com
Introduction To Solo3 Beats And Its Music Ecosystem
How to Upload Songs to Solo3 Beats
Immerse in the rhythmic world of Solo3 Beats—where every beat matters. Solo3 Beats headphones are not just about listening; they represent a fully-integrated music experience. Seamlessly uploading songs and enjoying high-quality audio is key to the Solo3 Beats ambiance. With these innovative headphones, music lovers can dive into their favorite tunes effortlessly.
Evolution Of Solo3 Beats Headphones
Solo3 Beats headphones have transformed the way we experience sound. From their humble beginnings to becoming a household name, Solo3 Beats abbreviate a journey of technological advancements. They boast longer battery life, supreme comfort, and crystal-clear audio, making them a top choice for audiophiles.
Highlights of this evolution include:
Improved connectivity with Bluetooth technology
Increased battery efficiency
Refined ear cushion design for extended listening
Role Of Music In Enhancing The Solo3 Beats Experience
The right music can turn a good headphone experience into a great one. Solo3 Beats soar with music, offering a powerful, emotive journey every time you hit play. The relationship between these headphones and their accompanying soundtracks is symbiotic—each song highlights the nuanced acoustic engineering of Solo3 Beats.
Key aspects include:
Advanced audio drivers delivering precise sound
Noise isolation features for uninterrupted immersion
Easy song uploading for personalized playlists
Before You Start: Requirements And Preparations
Planning to upload your favorite tracks to Solo3 Beats headphones? Great choice! These sleek headphones fill every beat with clarity. But, before diving into a musical journey, a little setup is necessary. Don’t worry, it’s easy! Let’s get things in order so the process is smooth and hassle-free. Read on to ensure you’ve got everything ready for a seamless experience.
Software Updates And Compatibility
Keeping your devices up-to-date is crucial. Software updates often include important fixes and new features. They might also help in smoothly transferring songs to your Solo3 Beats. So, let’s make sure your software is current:
Check the Beats: Confirm your Solo3 Beats have the latest firmware.
Update Your Device: Ensure the device you’re transferring music from, like a phone or computer, is running the latest OS.
Addressing compatibility is just as important:
Match the Beats with compatible devices only.
Use Bluetooth or appropriate audio software that syncs smoothly with your Solo3 Beats.
Creating A Music Library And Supported Formats
Next up, your music library! Having songs organized will make uploads a breeze. Here’s what to know:
Gather Your Music: Put all the tracks you want to upload in one folder on your device.
Supported Formats Matter: Solo3 Beats are flexible but do have preferences. They play well with most common formats like MP3, AAC, and WAV.
Keep your files in these formats:
Format
Description
MP3
Widely used, good balance between size and quality.
AAC
Preferred by Apple, works best with Apple devices.
WAV
Lossless quality, larger file size.
Now that you understand the prep work, you are all set to upload your songs and enjoy your Solo3 Beats to the fullest!
Connecting Solo3 Beats To Your Device
Love your Solo3 Beats but not sure how to get your tunes rolling? It’s all about making that initial connection to your favorite device. With these easy steps, you’ll be listening in no time. Let’s get those beats uploaded and ready for your enjoyment!
Pairing With Bluetooth-enabled Devices
To listen to your favorite tracks on Solo3 Beats, first pair them with your Bluetooth device. Follow this guide to connect your headphones in a flash:
Charge your Solo3 Beats to ensure they’re ready to pair.
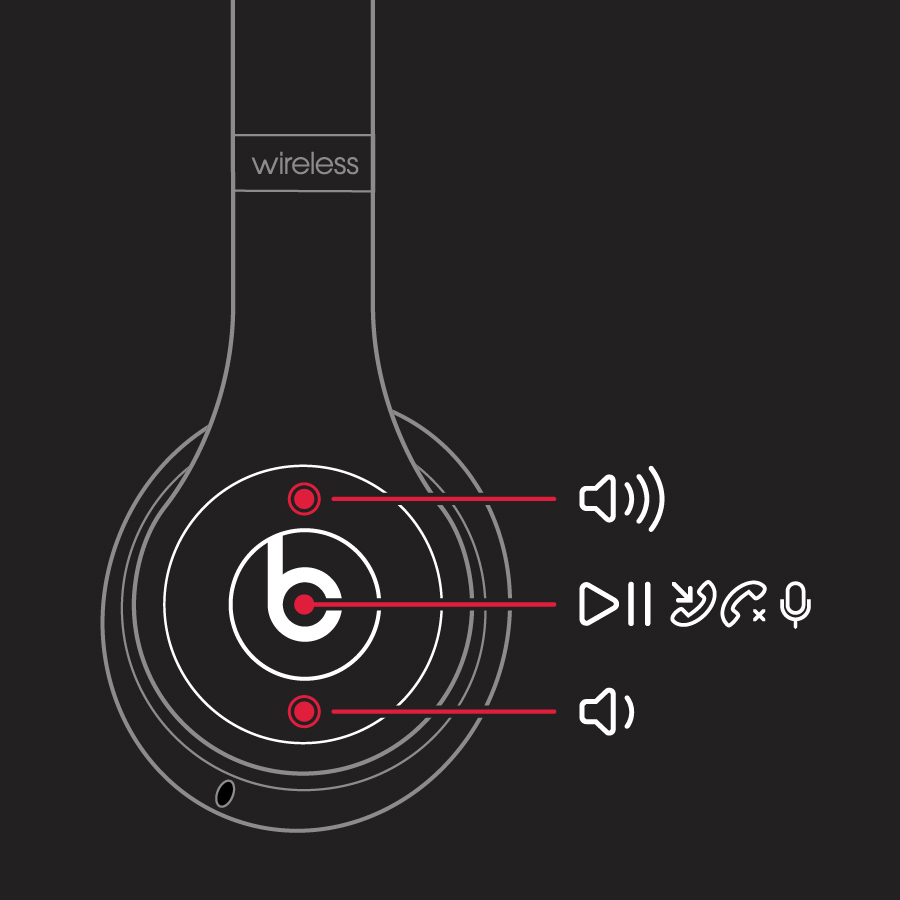
Press and hold the power button on your headphones for 5 seconds.
Look at the flashing LED light to confirm they’re in pairing mode.
On your device, navigate to Bluetooth settings and locate your headphones.
Select your Solo3 Beats and wait for the confirmation.
Your headphones should now be connected, pumping out all the songs you love!
Troubleshooting Common Connection Issues
Running into hiccups? Don’t stress! Check this list for quick fixes:
Issue
Solution
Headphones Not Found
Reset your Beats and scan again.
No Sound After Connecting
Check the volume on both device and Beats.
Intermittent Connection
Move closer to the device and avoid obstacles.
Ensure your headphones and device have sufficient battery.
Forget the device in Bluetooth settings and re-pair it.
Check for any software updates for your device and Beats.
If problems persist, reach out to Beats support for assistance.
Uploading Music To Your Library
Let’s dive into the world of music by uploading songs to your Solo3 Beats library. Whether you’re a fitness enthusiast looking for that adrenaline-pumping soundtrack or just someone who enjoys a good melody while relaxing, having your favorite tunes just a tap away is essential. Learn how to get your music files ready and manage them effectively, so you’re never without your top tracks.
Selecting Music Files For Upload
Begin by choosing the right tunes. Look for files on your device that have a compatible format with your Solo3 Beats. Most commonly, these are formats like MP3, AAC, or WAV. Organize your music by creating folders for different moods or activities. Make sure each file is properly named making it easier to locate your favorite songs later on.
Using Music Management Software
With your songs selected, it’s time to use music management software. This tool simplifies transferring your chosen melodies to your Solo3 Beats. Programs like iTunes for Apple devices or other popular music players for Android can help. Follow these steps:
Install the software on your computer.
Open the program and add music by dragging files into the library or clicking ‘Add to Library’.
Connect your Solo3 Beats to your computer.
Select your Beats in the device list.
Choose the ‘Sync’ option to transfer music.
Once synced, ensure your Beats have sufficient charge. Now, you can enjoy your music on-the-go.
Transferring Songs To Solo3 Beats
Ready to enjoy your favorite tracks on your Solo3 Beats? This guide will show you how to transfer your songs effortlessly. With simple steps, have your music with you, wherever you go.
Synchronization Via Cloud Services
Cloud services make syncing songs to your Solo3 Beats a breeze. You can use platforms like Apple Music or Spotify to access your playlists. Just ensure your Solo3 Beats are connected to your device, and you’re subscribed to a service.
Log in to your preferred streaming service.
Connect your Solo3 Beats using Bluetooth.
Select the playlist and hit play. Your songs will stream directly to your headphones.
Direct Transfer Methods
Direct transfers put music on your device, for your Beats to play. Use a cable or Bluetooth to copy songs from computers or phones. Here’s how:
Connect your device to a computer using a USB cable.
Open the music folder and select songs.
Drag and drop them into your device’s music library.
Disconnect after the transfer completes.
Turn on your Solo3 Beats and connect them to your device via Bluetooth.
Play the songs through your device’s music player.
Credit: www.beatsbydre.com
Best Practices For Managing Your Music On Solo3 Beats
Welcome to our comprehensive guide on managing your music with Solo3 Beats. Solo3 Beats headphones offer an immersive music experience, but proper organization and management can take your listening to the next level. Follow these best practices to keep your tunes right at your fingertips and your Beats playing longer.
Organizing Your Tracks And Playlists
Efficient organization means more time enjoying the music and less time searching for your favorite tracks. Here’s how to keep your playlist in perfect harmony:
Create thematic playlists: Group songs by mood, genre, or occasion.
Use consistent naming conventions: This simplifies finding the playlist you want.
Regularly update your playlists: Add new finds and remove tracks you skip often.
Backup your music library: Protect against data loss by backing up your playlists.
With these steps, your Solo3 Beats will deliver a seamless audio experience every time you press play.
Maximizing Battery Life During Playback
To ensure your Solo3 Beats are always ready to groove, conserve battery life with these tips:
Lower the volume: Louder volumes drain battery faster, find a comfortable mid-level.
Turn off noise cancellation: When not needed, disabling this feature saves power.
Keep firmware updated: Updates often include battery performance improvements.
Store properly: When not in use, keep your Beats in a cool, dry place.
Adhere to these practices and your Solo3 Beats will become a dependable partner for your daily soundtracks.
Common Issues And How To Resolve Them
Are you facing trouble with your Beats Solo3 headphones? You’re not alone! Users often encounter snags with technology. Here’s a quick guide to troubleshoot common issues with song uploads to your Solo3 Beats. Keep the music flowing without a hitch!
Dealing With Playback Errors
Playback errors can dampen your listening experience. Here’s what you can do:
Check the audio file format. Solo3 Beats support most formats, but not all.
Ensure the connection is secure. A loose connection can interrupt your jam.
Reboot your device. This can fix minor glitches causing errors.
Reset your headphones. Hold the power button for 10 seconds to reset.
Updating Firmware For Optimal Performance
Boost your beats with the latest firmware. Ensuring your Solo3 Beats are up to date can improve performance.
Connect your Solo3 Beats to a power source.
Pair your headphones to an iOS device.
Install the Beats app for iOS or update it if you have it already.
Follow on-screen instructions to update firmware.
Credit: support.apple.com
Conclusion: Enjoying Your Music Anytime, Anywhere
Experiencing seamless music just got easier with the Solo3 Beats. The power of music is undeniable. Now, take your favorite tracks everywhere you go. Solo3 Beats make sure that your music is always just a click away.
The Convenience Of Wireless Listening With Solo3 Beats
Wireless technology brings you freedom. Say goodbye to tangled wires. The Solo3 Beats offer effortless pairing with your device. Charge them up, connect, and dive into your music.
Quick charging capability
Long battery life
Easy on-the-go connectivity
Exploring New Features And Updates
Stay updated with the latest. Solo3 Beats often receive new features through firmware updates. Enhance your listening with improvements and fresh functions.
Check for updates regularly
Enjoy improved sound quality and features
Personalize your listening experience
Conclusion
Uploading your favorite tracks to Solo3 Beats is a breeze with the right steps. We’ve walked through the easy-to-follow method, ensuring a seamless experience. Now, it’s over to you to enjoy your music with unbeatable sound quality. Dive in, enrich your playlists, and let the rhythm move you!
Hello, I am Howard E. Glover, the CEO, and founder of soundsvia.com We Are Talk About Audio Sounds Systems like Headphones, Earbuds, Headset, and Earphones